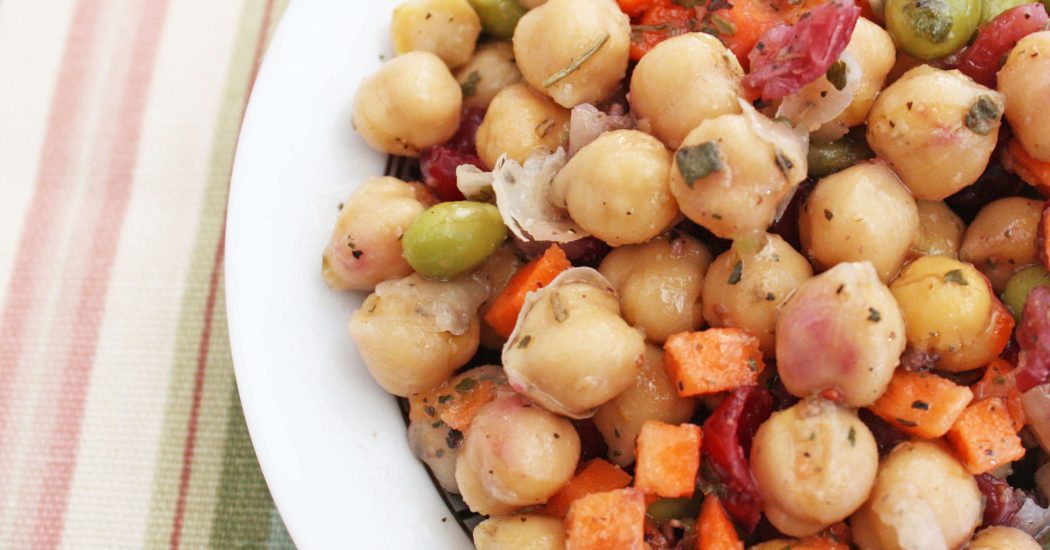
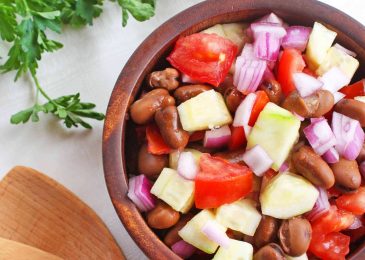
Archive for Lunch
Loaded Baked Potato Soup
Mar 04 2013 by | Comments
Add to Recipe Box
This is without a doubt the best soup I’ve ever had and I’ve had a lot of soup in my lifetime. I’m in love with the creamy smooth texture, the simple yet comforting flavor and the garnishes – yummy! I love that each person can make this soup be whatever they want. I love it topped with roasted fingerling potatoes, a sprinkle of Daiya cheese and dash of chives. My husband loaded his soup with Italian Sausages, caramelized onions and sautéed mushrooms. No matter how you serve it up it’s bound to be delicious! This soup is also oil free for those that follow a low or no oil diet. Almonds take the place of the oil without sacrificing the richness that oil normally brings plus they create an amazing creaminess. Spring might be right around the corner but there is still plenty of time to enjoy this amazing dish!
~Sarah
Ingredients:
For the soup:
- 6 cups vegetable broth
- heaping 1/2 cup blanched slivered almonds
- 2 large russet potatoes, peeled
- 1/3 cup nutritional yeast
- 1-2 tsp sea salt
- 1/4 cup Earth Balance Organic Whipped Buttery Spread (optional)
For the optional toppings and garnish:
- Daiya Cheddar Cheese
- finely chopped chives or parsley
- fingerling potatoes, diced and roasted
- caramelized onions
- sautéed mushrooms
- diced tomatoes
- sautéed or roasted broccoli
- chopped Italian Sausages
Preparation:
- Place your peeled potatoes in a large pot of cold water. Bring to a boil and cook until the potatoes are tender.
- Drain the water and potatoes from the pot and set the potatoes aside.
- Return the pot to the stove and add the vegetable broth. Heat on medium high heat. Add in the almonds and let them soften in the broth for about 5 minutes. Reduce the heat if needed to keep the broth from boiling.
- Add the potatoes, nutritional yeast, salt and Earth Balance (if using). Stir well and remove from heat.
- Using a handheld blender (you can also transfer the ingredients to a high powered blender) process until you have a thick and creamy consistency. Reheat if necessary before serving.
- Ladle the soup into bowls and load with any of the optional garnishes and toppings that you’d like. Enjoy!
Yield:
Makes 6-8 servings.
Notes:
This soup makes for excellent leftovers. It’s best when storing the leftovers to keep the soup and the garnishes/toppings separate. The soup will keep for up to 5 days in the fridge.
SooFoo Salad
Feb 27 2013 by | Comments
Add to Recipe Box
SooFoo – such a fun name isn’t it? I wish I could take credit for such a creative title but SooFoo is actually a new product that just hit the shelves of my local health food store and it sounded so interesting that I just had to give it a try. SooFoo, along with being fun to say, is actually a mix of super healthy organic grains and is pretty delicious all by itself. SooFoo is a mix of barley, black beluga lentils, brown lentils, buckwheat, green lentils, long grain brown rice, steel cut oats, rye berries and Yera Cora rojo wheat berries. To get acquainted with this neat product I decided to make a simple salad. I loved the texture that all the different grains brought to this dish. You can easily substitute with any of your favorite veggies and if you can’t find SooFoo on the shelves of your local grocery store then simply use your favorite grain instead. I’ve already been playing around with different SooFoo recipes so enjoy this one for now and keep your eyes peeled for even more creative ways to get your SooFoo on!
~Sarah
Ingredients:
- 3 cups cooked SooFoo
- 1/2 cup finely chopped zucchini
- 1/2 cup quartered cucumber
- heaping 1/2 cup grated or julienned carrot
- 1/4 cup finely diced tomato
- 1 cup cooked kidney beans
- 1 1/2 cups thinly sliced kale (chiffonade style)
- 1/4 cup thinly sliced green onion
- 1/8 cup finely diced fresh parsley
- 1/8 cup diced green pepper
- 1/2 cup extra virgin olive oil
- 1/4 cup low sodium tamari or soy sauce (gluten free if needed)
- 3 tbsp lemon juice
- 3 tbsp apple cider vinegar
- 1/2 tsp oregano
- 1/8 tsp thyme
- 1/8 tsp basil
- sea salt to taste
Preparation:
- In a small bowl mix together the last 8 ingredients. Stir well and set the dressing aside.
- Add the remaining ingredients to a large bowl and pour the dressing over top. Mix well.
- Serve immediately or let chill in the fridge until ready to serve.
Yield:
Makes 6-8 servings.
Notes:
This salad is great for leftovers. It can be stored in an airtight container in the fridge for up to 5 days.
Jicama Stacks
Feb 25 2013 by | Comments
Add to Recipe Box
Jicama is so fun to work with. It’s crisp and clean and plays really well with other foods. Some of jicama’s friends, carrot, cucumber and pineapple came over to play so here they are all stacked together with a kickin’ dressing that is bright and fresh. Come join the party!
Kristy
Ingredients:
- 1 medium sized jicama
- 1 large or 2 medium carrots (peeled or unpeeled), julienned (about 1/2 cup)
- 1 medium cucumber (preferably unpeeled), julienned (about 1/2 cup)
- 1/4 pineapple (peeled), julienned (about 1/2 cup)
- 1 loosely packed cup parsley, roughly chopped
- 1/3 cup neutral flavor oil
- 1/4 cup lime juice (about 2 limes)
- 1/3 cup toasted pumpkin seeds, divided
- 1 serrano chili, seeded and chopped
- 1 shallot, chopped
- 1 tbsp tamarind paste
- 2 tsp coriander seeds
- 2 tsp raw honey or coconut nectar
- 1/2 tsp sea salt
Preparation:
- Peel the jicama and cut in half horizontally. Cut 8 thin slices from the widest part of the tuber and set aside. Julienne the remaining jicama.
- Lightly toss the jicama, carrot, cucumber and pineapple in a bowl.
- Heat a small skillet over medium high heat and add the coriander seeds and toast until fragrant about 2-3 minutes. Remove from heat and let cool. Place in a spice mill or coffee grinder and grind.
- Transfer the ground seeds to a blender along with the 1/4 cup pumpkin seeds and the remaining ingredients. Blend until smooth.
- Toss the vegetable mixture with the dressing.
- Place 4 slices of jicama slice on 4 serving plates and top each with a handful of the vegetables. Top with remaining slices of jicama.
- Garnish with remaining pumpkin seeds.
Yield:
Makes 4 servings
Notes:
Store leftovers in a sealed container for 1-2 days.
Crunchy Spring Roll with Creamy Ginger Spread
Feb 22 2013 by | Comments
Add to Recipe Box
I adore spring rolls. They are so versatile and you can’t really go wrong when making them. You can add any of your favorite veggies along with rice or noodles and serve with a side of delicious dipping sauce – an easy lunch or dinner. I was playing around a few weeks ago trying to come up with a new dressing recipe and the results ended up being thicker than I wanted. I loved the flavor and realized that it would make a better spread then dressing anyways so I paired it with some crunchy vegetables, wrapped them in a spring roll wrapper and I had one delicious creation. I used the dipping sauce from my Perfect Potsticker Wraps but it would also be great with some Savory Peanut Dipping Sauce.
~Sarah
Ingredients:
For the Creamy Ginger Spread:
- 2 green onions, roughly chopped
- 1 shallot, peeled
- 3 tbsp grated ginger
- 1/2 tsp sea salt
- 6 tbsp neutral oil (sunflower or safflower are good choices)
- 1 tbsp fresh lemon juice
- 1 tbsp miso (I used chickpea miso but a sweet white miso would work too)
For the Crunchy Spring Roll:
- several bok choy leaves, dark leafy green part only
- handful snow peas, ends trim and cut into thin strips
- 1/2 an orange bell pepper, cut into thin strips
- 2-3 ounces rice noodles, cooked according to the directions on the package
- 1/2 a cucumber, peeled if desired, seeded and cut into thin strips
- 1 avocado, cut into thin strips, optional
- sprouts of your choice, optional
- mushrooms, optional
- 6-8 spring roll wrappers
Preparation:
- Place all the ingredients for the ginger spread in a blender and process until you have a thick paste. If the mixture is too thick or won’t blend add another tbsp or so of oil or water if desired. Set aside.
- Dip each spring roll wrapper in a bowl of hot water for about 3 seconds. The wrapper should still be somewhat stiff (don’t worry – it will soften as it continues to absorb the water!).
- Lay the wrapper on a smooth work surface and add a generous dab of creamy ginger spread. Evenly distribute the spread along the middle of the wrapper.
- Add a layer of bok choy, snow peas, bell pepper, noodles and cucumber. Top with any of the optional ingredients.
- Take one end of the wrapper and fold it over your ingredients. Gently roll away from you as you tuck the filling toward you.
- Using a sharp knife, cut the spring roll in half and serve with your favorite dipping sauce.
Yield:
Makes 2-3 servings.
Notes:
Spring rolls are best when served right away. You can store leftovers in an airtight container in the fridge but be aware that they tend to stick together.
For a truly raw meal try substituting the spring roll wrapper with Pure Wraps – they are made entirely from coconut meat!
Pizza Alla Raw
Feb 21 2013 by | Comments
Add to Recipe Box
I am a HUGE fan of pizza and so is my whole family! They would be quite happy to have a pizza night just about every single night. Unfortunately, traditional pizzas are not tipping the scales in the nutritional department – until now. This ‘raw’ pizza is amazing! If you’ve never had a raw pizza you are truly missing out. The marinated veggies are warm and comforting and the sauce and ‘cheese’ are to die for! This recipe does require a bit of work but it’s all worth it in the end when you sit back, take a bite and enjoy the most amazing pizza you’ve ever had. This week, Living On The Veg has truly outdone themselves! Enjoy.
My culinary roots were established in an Italian restaurant in which we made the pizza dough from scratch, hand-tossed it, then fired it in a wood burning oven, a hand crafted creation from start to finish. Also, it was a perfect canvas for showcasing the variety of ingredients and combination of flavors you can use to please anybody’s palette. With this raw pizza recipe we intertwine the aspect of nutrition with tradition, by offering an enzyme and nutrient rich option with all the classic tastes of Italy. Using fresh produce, herbs and spices, we present this Pizza alla Raw with confidence knowing it will astound any appetite and satisfy any stomach. “When the moon hits your eye like a big pizza pie, that’s AMORE! In Italian amore means love, and we know you’ll fall in love with this recipe after your first slice! Buon Apetito!
-Chef Matthew Purnell, Living On The Veg
Ingredients:
For the crust:
- 4 cups yams, roughly chopped
- 2 cups zucchini, roughly chopped
- 1 cup tomatoes, roughly chopped
- 1 cup carrots, roughly chopped
- 1 cup onions, roughly chopped
- 1 cup red bell pepper, roughly chopped
- 1 cup parsley
- 1 cup basil
- 2 tbsp fresh oregano
- 2 tbsp fresh rosemary
- 1 tbsp fresh thyme
- 1 tbsp sea salt
- 1 tbsp Italian seasoning
- 1 tsp black pepper
- 1 cup chia seeds, ground
- filtered water as needed
For the pizza sauce:
- 2 cups tomatoes of your choice
- 2 cups sun-dried tomatoes
- 1/4 cup extra virgin olive oil
- 1 cup basil
- 1 cup parsley
- 1/4 cup onion, roughly chopped
- 2 tbsp raw apple cider vinegar
- 2 tbsp minced garlic
- 1 tbsp coconut nectar
- 1 tsp sea salt
- 1 tsp black pepper
For the ‘cheese’:
- 2 cups cashews, soaked
- 2 tbsp raw apple cider vinegar
- 3 tbsp fresh lemon juice
- 1/2 tsp probiotic of your choice
- 1 tsp sea salt
- filtered water as needed
For the veggie mix:
- 4 cups mushrooms, thinly sliced
- 2 cups squash, thinly sliced
- 1 cup onions, thinly sliced
- 1 cup red bell pepper, thinly sliced
- 1/4 cup extra virgin olive oil
- 2 tbsp basil, shredded into thin strips (chiffonade)
- 2 tbsp parsley, chopped
- 2 tbsp Nama shoyu (if you follow a gluten free diet substitute with a gluten free soy sauce or tamari)
- 2 tbsp minced garlic
- 2 tsp Italian seasoning
- 1 tsp sea salt
- 1 tsp black pepper
Preparation:
- Add the first 14 crust ingredients to a blender and blend until well mixed (add a bit of filtered water as needed to help blend the ingredients).
- Transfer the mixture to a large mixing bowl and gradually add 1 tbsp ground chia seeds until the crust mixture begins to bind together. The mixture should be thick enough to spread on a teflex sheet without dripping over the sides.
- Form the crust mixture into desired shape and place in a dehydrator at 115 degrees for about 8 hours. Flip the crust over, remove the teflex sheet and continue to dehydrate for an additional 4 hours or until completely dried.
- Add all the ingredients for the pizza sauce to a blender or food processor. Process until well mixed and smooth.
- Rinse out the blender and add the ingredients for the ‘cheese’. Blend until throughly mixed. The ‘cheese’ should be a smooth thick consistency.
- Place all the ingredients for the veggie mix into a large bowl and toss until well coated. Evenly spread the mixture onto a teflex sheet and place in the dehydrator at 115 degrees 1-2 hours before serving your pizza.
- To assemble the pizza place a layer of pizza sauce evenly over the crust, cover with ‘cheese’ and top with the veggie mix. Serve immediately and enjoy!
Yield:
Makes one 12-14 inch pizza.
Notes:
Leftover pizza can be stored in an airtight container in the fridge for up to 3 days. Reheat in a dehydrator for best results.
All components can be made ahead of time and assembled as needed.
Springtime Tofu Scramble
Feb 19 2013 by | Comments
Add to Recipe Box
While I call this recipe a Springtime Tofu Scramble it would also be accurate to call it Tofu Scramble 2 Ways. Two different spring time vegetables, artichokes or asparagus can easily be interchanged depending on availability and your personal taste preferences. Tofu is marinaded in a light and lovely citrus/basil sauce and then scrambled together with mushrooms, carrots, spinach, tomato and leeks to make a delicious breakfast, lunch or dinner. If you are lucky enough to find another spring delicacy, ramps, you can use them in place of the leeks for an even tastier treat.
Either way this dish is delicious and a really good recipe to keep in mind for your Easter brunch.
Kristy
Ingredients:
For the marinade
- 1/4 fresh lemon juice
- zest from 1 lemon
- 3 tbsp olive oil
- 3 tbsp coconut aminos
- 2 tbsp fresh basil, minced
- 1 tbsp Dijon mustard
- 1 tbsp honey or coconut nectar
- 1/2 tsp tumeric
For the scramble
- 14 ounces (1 package) extra firm tofu, cut into cubes
- 2 tbsp olive oil
- 1 leek, white part and about 3 inches of the green top,cut in half, and thoroughly washed then thinly sliced
- 2 cloves garlic, minced
- 1/2 tsp sea salt
- 6 ounces artichoke hearts or about 6-8 artichoke hearts steamed or roasted and cut into quarters or 1 cup asparagus cut into 1 inch pieces
- 1 carrot, julienned
- 8 cremini mushrooms, sliced
- 1 medium sized tomato, diced
- 1 cup spinach, roughly chopped
Preparation:
- In a small bowl whisk together the marinade ingredients. Place the tofu cubes into a 1 gallon zip bag and pour in the marinade. Seal and place in the refrigerator at least 2 hours or up to 24 hours.
- In a large skillet (I use a very large 5 qt pan) heat the oil over medium high. Add the leeks, garlic and sea salt. Cook 4-5 minutes until the leeks are almost tender.
- Add the artichokes (or asparagus), carrots and mushrooms. Cook 2-3 minutes and then add the tomato and tofu (reserve the marinade). Break up the tofu by pressing with the back of a fork to create a scrambled egg kind of texture. Pour in half the marinade from the bag.
- Add the spinach and cook until the spinach is wilted and most of the marinade has cooked off.
- Serve with toast, in a tortilla or pita or on it’s own.
Yield:
Makes 4 servings.
Notes:
This dish is best eaten right away.
Blood Oranges and Golden Beets
Feb 15 2013 by | Comments
Add to Recipe Box
Citrus fruit is abundant this time of year and what a good thing too. Who couldn’t use a bit of that bright citrus color and flavor when winter seems to be dragging on forever and you wonder if spring will ever arrive? Well cheer up because the first day of spring is only about 5 weeks away and in the meantime you can try this fresh and spring-like recipe starring blood oranges, one of the most beautiful of all citrus fruit.
Kristy
Ingredients:
- 5 blood oranges, 5 cut into supremes and 1 juiced.
- 2 medium golden beets, top trimmed
- 4 cups baby arugula
- 1/2 red onion, thinly sliced
- 1/2 fennel bulb, thinly sliced
- 6 tbsp extra virgin olive oil
- 1 tbsp balsamic vinegar
- 1 tbsp lemon juice
- 1 tsp honey or coconut nectar
- 3 tsp fresh basil, minced
- 1/2 tsp sea salt or to taste
Preparation:
- Preheat oven to 350 degrees. Individually wrap the beets in foil and place on a baking sheet.
- Roast until tender, about 1-1 1/2 hours depending on the size of the beets. When cooled peel off the skin and set aside.
- Cut 4 oranges into supremes (see our post on how to supreme citrus). In a small bowl squeeze the juice from the orange pulp and then add juice from the remaining orange to equal 2 tbsp.
- Add the balsamic vinegar, lemon juice, 2 tsp basil, honey and salt. Whisk in the olive oil.
- Arrange 1 cup of arugula on to each serving plate. Thinly slice the beets and layer over the greens. Arrange equal portions of the orange supremes over the beets.
- Top with equal amounts of red onion and fennel.
- Drizzle with dressing and garnish with remaining basil.
Yield:
Makes 4 servings
Notes:
The beets can be roasted at any time and then sliced when ready to serve. Substitute with regular oranges if you don’t have blood oranges available.
Pineapple Basil Kelp Noodles
Feb 12 2013 by | Comments
Add to Recipe Box
What better way to beat the winter blues than with a fun and delicious tropical recipe. This week’s recipe from Living On The Veg is sure to take you to the sunny shores of Maui. So sit back, enjoy the island breeze and forget all about that snow and cold.
I rarely frequent the produce aisle of the organic grocery store for my fruit and vegetable purchases. I prefer to pick up most of my plant food supply at Farmer’s Markets to maintain fresh, local, and in season foods. But when I went into my favorite local market, Cream of the Crop in Oceanside I was super excited to see one of my favorite fruits in season, pineapple! Not just any pineapple, because those will just not do, the Maui Gold Pineapples. They are always so sweet and delicious. They also have the rich deep flavor of actual pineapple, which is not the norm to me when purchasing a pineapple. Even an organic Dole pineapple can not come close to this. I wanted something savory and sweet, so I paired this pineapple with basil and my favorite kelp noodles for a dish that inspires the Aloha spirit. Enjoy!
~ Chef Fuji from Living On The Veg
Ingredients:
- 3 cups diced pineapple
- 1/4 cup coconut aminos
- 1 tbsp coconut nectar
- 1 tbsp no salt added almond butter
- 1 tbsp cayenne or other chile (if desired)
- 2 packages of kelp noodles, rinsed and drained
- 1/2 cup basil, chiffonade (thinly sliced)
- 1 cup broccoli florets
- 1 cup sweet peppers, julienned
Preparation:
- Cut noodles to desired length and place in a large bowl with basil, broccoli, and peppers, reserving 2 tbsp of basil for garnish.
- Add the first 5 ingredients to blender and process until the sauce is smooth.
- Pour the sauce over the noodles and veggies, stir and let marinate until noodles soften or place in dehydrator at 115 to warm about 20 minutes.
Yield:
Makes 4-6 servings.
Notes:
Leftover noodle salad can be stored in an airtight container in the fridge for up to 3 days.
Creamy Carrot, Cauliflower and Ginger Soup
Feb 06 2013 by | Comments
Add to Recipe Box
If you want to make a creamy soup there are several ways you can go. Milk of course is the obvious choice thickened with a roux but there are several other more nutritious options that I prefer. Beans, cashews, potatoes or as in this recipe, cauliflower, because while each thicken and add texture they also add more nutrition and flavor. Roasting the carrots and cauliflower increases the flavor even further bringing out the caramel like sweetness of the vegetables.
Sweet, savory and lightly delicious this creamy soup is just the thing to keep the spring chill at bay without weighing you down.
Kristy
Ingredients:
- 1 head cauliflower, cut into 1-2 inch pieces
- 6-7 large carrots, peeled or unpeeled – your choice, cut into 1 inch pieces
- 1/2 medium onion, diced
- 1 stalk celery, diced
- 2 cloves garlic, minced
- 1 inch piece ginger, peeled and minced
- 2 1/2 tbsp olive oil, divided
- 5 cups low sodium vegetable broth
- 1 tsp sea salt or to taste
- 6 tbsp chives, thinly sliced
Preparation:
- Preheat oven to 400 degrees.
- Toss the carrots and cauliflower in 2 tbsp oil and lay in a single layer on a baking sheet. Sprinkle with 1/2 tsp salt. Roast 30 minutes or until the carrots are tender and the cauliflower is just beginning to brown around the edges.
- When the vegetables are done roasting heat the remaining oil in a large soup pot over medium high heat. Add the onions, celery and remaining 1/2 tsp salt. Cook 3-5 minutes or until the onions are tender. Add the garlic and ginger and cook another 2-3 minutes.
- Add the roasted vegetables to the pot along with the vegetable broth. Bring to a boil, cover and lower heat to a simmer. Simmer 10 minutes.
- Remove from the heat and with a stick blender blend until smooth or blend in batches in a food processor or blender.
- Spoon into bowls and garnish with chives.
Yield:
Makes 8 cups.
Notes:
Leftover soup can be stored in an airtight container in the fridge for up to 5 days.
Red Potatoes and Broccoli with Spicy Cilantro Hemp Seed Pesto
Feb 04 2013 by | Comments
Add to Recipe Box
I’ve been on a potato kick lately so I was thrilled when I saw this recipe from Living on the Veg! I love a good potato salad and this dish won’t disappoint. It’s light and refreshing and packed with flavor. Enjoy!
The robust and aromatic essence of a traditional basil pesto is a favorite around my kitchen. The pungent garlic, fresh basil and rich olive oil make each simple taste exquisite when combined. From vine ripened tomatoes, crisp cucumbers or a flavorful sandwich spread, pesto is very versatile and can used in a variety of dishes to take them to another level. Using the classic recipe of a basil pesto and giving it a creative twist, by using fragrant cilantro, fresh lime juice, a pinch of red chili flakes and highly nutritious hemp seeds for that the nutty finish, you have pesto with a spicy zest to kick up any recipe that needs a little revival. Pairing this creation with perfectly steamed broccoli and creamy red potatoes is a perfect match, that cupid can’t even deny. Take pleasure in this enlivening recipe to wake up your taste buds from hibernating all winter.
-Chef Matthew Purnell from Living on the Veg
Ingredients:
For the pesto sauce:
- 2 cups cilantro leaves, chopped
- 1 cup hemp seeds
- 1/2 cup extra virgin olive oil
- 5-6 cloves garlic, peeled
- 1/4 cup freshly squeezed lime juice
- 1 tsp sea salt
- 1 tsp ground cumin
- 1 tsp red chili flakes
For the potato salad:
- 8 cups small red potatoes
- 6 cups broccoli florets
- 1/4 cup green onions, thinly sliced
Preparation:
For the pesto sauce:
- Add all ingredients for the pesto sauce except olive oil to a food processor. Process for 10-15 seconds and then start to slowly drizzle the olive oil into the food processor.
- Scrape down the sides if necessary and add more salt if desired. Remove from the food processor and set aside.
For the potato salad:
- Heat a large pot over medium high heat, cover bottom with about 4 cups of water, and bring to boil.
- Reduce heat to medium and put steamer basket in place.
- Prepare the potatoes by washing thoroughly and cutting into even pieces or leave whole if they are all the same size.
- Place potatoes in steamer basket, cover with lid and cook until fork tender, approximately 15-20 minutes depending on size of potatoes.
- Be careful not to over steam otherwise you will have mashed potatoes on your hands.
- Remove potatoes from steamer basket and place in a large mixing bowl.
- Mix in pesto and sliced green onion with hot steamed potatoes and toss well.
- Place the broccoli in steamer basket and cook until tender, but still bright green.
- Mix in broccoli and toss well. Serve immediately or at room temperature.
Yield:
Serves 4-6.
Notes:
Leftover salad can be stored in an airtight container in the fridge for up to 3 days.


